
티스토리 뷰
#안드로이드 앱에 쓰면 좋을 아이콘들
https://design.google.com/icons/index.html
Material icon collection ⇐ 구글이 공식지원하는 아이콘들

drawable : 앱 내부에서 쓰이는 아이콘들을 크기별로 다 넣는다.
mipmap : 앱 아이콘을 크기별로 다 넣는다.
#Drawable Layout 실습
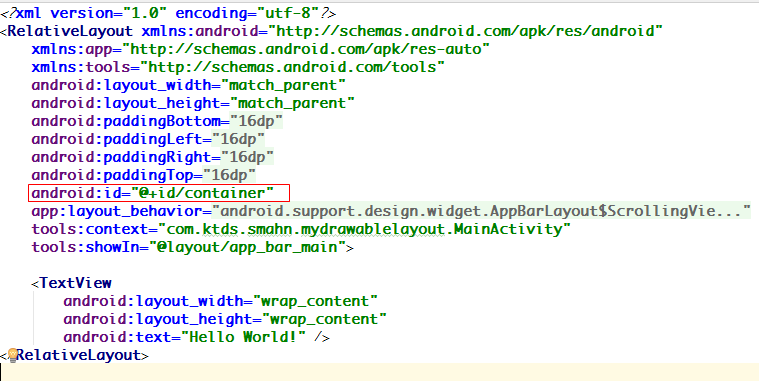
1. content_main.xml 에 id를 추가해준다.
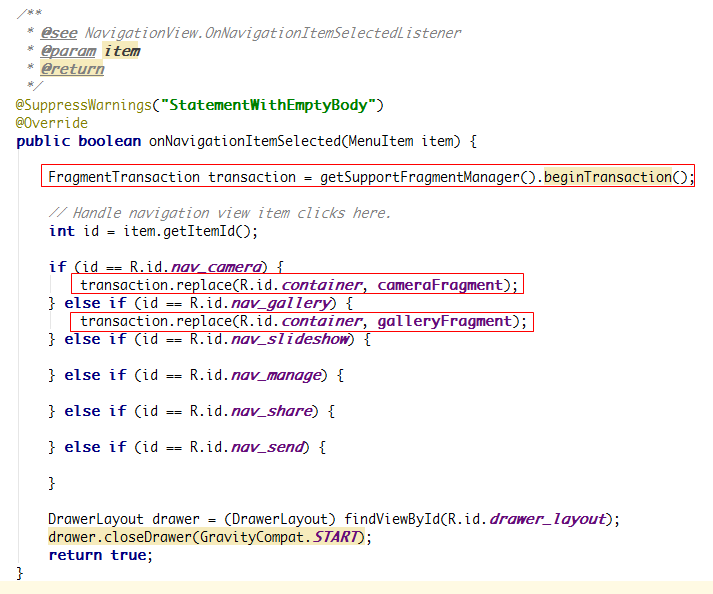
2. 메뉴를 클릭했을 때 발생하는 이벤트를 제어해줘야한다.
NavigationView navigationView = (NavigationView) findViewById(R.id.nav_view);
navigationView.setNavigationItemSelectedListener(this);
this라고 주고 위에서 implements NavigationView.OnNavigationItemSelectedListener 이렇게 하면, 아래에
NavigationView.OnNavigationItemSelectedListener 의 구현체를 따로 빼서 메소드로 처리할 수 있다. 그게 바로
@SuppressWarnings("StatementWithEmptyBody")
@Override
public boolean onNavigationItemSelected(MenuItem item) {
// Handle navigation view item clicks here.
int id = item.getItemId();
if (id == R.id.nav_camera) {
// Handle the camera action
} else if (id == R.id.nav_gallery) {
} else if (id == R.id.nav_slideshow) {
} else if (id == R.id.nav_manage) {
} else if (id == R.id.nav_share) {
} else if (id == R.id.nav_send) {
}
DrawerLayout drawer = (DrawerLayout) findViewById(R.id.drawer_layout);
drawer.closeDrawer(GravityCompat.START);
return true;
}
이거다. 그런데 이건 아는사람만 알고 모르는 사람은 모르기 때문에, 항상 주석을 달아서 이게 인터페이스의 구현체라는 사실을 알려주어야 한다.
그렇기 때문에
/**
* @see NavigationView.OnNavigationItemSelectedListener
* @param item
* @return
*/
이거를 메소드위에 붙여넣어주는 것이 좋다.
3. 아이템을 클릭했을 때 Toast가 뜨도록 만들어보자.
Toast.makeText(MainActivity.this, "카메라를 선택했습니다.", Toast.LENGTH_SHORT).show();
이렇게 쓰고 실행을 하면 토스트가 잘 뜨는 것을 볼 수 있을 것이다.
이제 아이템을 클릭했을 때 프래그먼트가 뜨도록 바꿔볼 것이다.
4. CameraFragment와 GalleryFragment를 만든다.
1 2 3 4 5 6 7 8 9 10 11 12 13 14 15 16 17 18 19 20 21 22 23 24 25 26 27 28 29 30 31 32 33 34 35 36 37 38 39 40 41 42 43 44 45 46 47 48 49 50 51 52 53 54 55 56 57 58 59 60 | package com.ktds.smahn.mydrawablelayout;
import android.os.Bundle; import android.support.v4.app.Fragment; import android.view.LayoutInflater; import android.view.View; import android.view.ViewGroup;
public class GalleryFragment extends Fragment { // TODO: Rename parameter arguments, choose names that match // the fragment initialization parameters, e.g. ARG_ITEM_NUMBER private static final String ARG_PARAM1 = "param1"; private static final String ARG_PARAM2 = "param2";
// TODO: Rename and change types of parameters private String mParam1; private String mParam2;
public GalleryFragment() { // Required empty public constructor }
/** * Use this factory method to create a new instance of * this fragment using the provided parameters. * * @param param1 Parameter 1. * @param param2 Parameter 2. * @return A new instance of fragment GalleryFragment. */ // TODO: Rename and change types and number of parameters public static GalleryFragment newInstance(String param1, String param2) { GalleryFragment fragment = new GalleryFragment(); Bundle args = new Bundle(); args.putString(ARG_PARAM1, param1); args.putString(ARG_PARAM2, param2); fragment.setArguments(args); return fragment; }
@Override public void onCreate(Bundle savedInstanceState) { super.onCreate(savedInstanceState); if (getArguments() != null) { mParam1 = getArguments().getString(ARG_PARAM1); mParam2 = getArguments().getString(ARG_PARAM2); } }
@Override public View onCreateView(LayoutInflater inflater, ViewGroup container, Bundle savedInstanceState) { // Inflate the layout for this fragment return inflater.inflate(R.layout.fragment_gallery, container, false); }
}
|
이렇게 일단 기본 템플릿을 만들어준다.
5. MainActivity.java에 Fragment를 연결해준다.
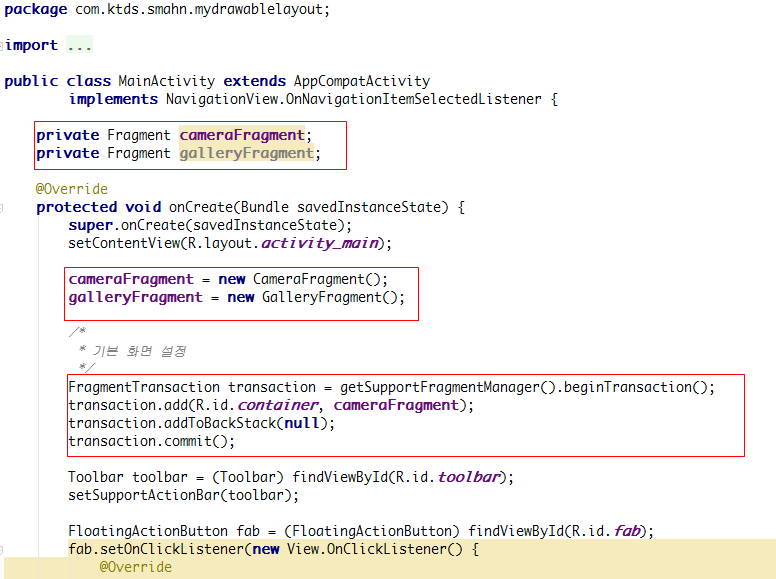
그리고 아래에도 다음과 같이 적어준다.
6. Fragment를 구분할 수 있도록 다음과 같이 xml을 수정해준다.
Fragment_camera.xml
1 2 3 4 5 6 7 8 9 10 11 12 13 14 15 | <LinearLayout xmlns:android="http://schemas.android.com/apk/res/android" xmlns:tools="http://schemas.android.com/tools" android:orientation="vertical" android:layout_width="match_parent" android:layout_height="match_parent" tools:context="com.ktds.smahn.mydrawablelayout.CameraFragment">
<!-- TODO: Update blank fragment layout --> <TextView android:layout_width="match_parent" android:layout_height="match_parent" android:text="Camera" />
</LinearLayout>
|
Fragment_gallery.xml
1 2 3 4 5 6 7 8 9 10 11 12 13 14 15 | <LinearLayout xmlns:android="http://schemas.android.com/apk/res/android" xmlns:tools="http://schemas.android.com/tools" android:orientation="vertical" android:layout_width="match_parent" android:layout_height="match_parent" tools:context="com.ktds.smahn.mydrawablelayout.GalleryFragment">
<!-- TODO: Update blank fragment layout --> <TextView android:layout_width="match_parent" android:layout_height="match_parent" android:text="Gallery" />
</LinearLayout>
|
7. 실행한다.


'프로그래밍 > 안드로이드' 카테고리의 다른 글
| View Pager 실습, 외부 라이브러리 사용하여 꾸미기 (1) | 2016.06.17 |
|---|---|
| Fragment 띄우기 (0) | 2016.06.16 |
| [facebook 연동] 포스팅하기 (0) | 2016.06.16 |
| [facebook 연동]메뉴바에 글쓰기 버튼과 뒤로가기 버튼 만들기 (0) | 2016.06.16 |
| [facebook 연동] 메시지, 스토리, 링크 구분하여 뉴스피드 보여주기 (0) | 2016.06.16 |
- Total
- Today
- Yesterday
- Linear Layout
- sql
- 클래스
- intent
- MVC
- 뉴스피드 가져오기
- Erwin
- facebook 연동
- 자바프로그래밍
- activity
- JSP
- er다이어그램
- 게시판 만들기
- 메뉴바에 버튼 생성하기
- mongo db
- Relative Layout
- 글쓰기 버튼
- spring
- 제이쿼리
- 메소드
- query
- jQuery
- 포스팅하기
- 뒤로가기 버튼
- 쿼리
- 예외처리
- ERD
- aop
- 배열
- mybatis
| 일 | 월 | 화 | 수 | 목 | 금 | 토 |
|---|---|---|---|---|---|---|
| 1 | 2 | 3 | 4 | |||
| 5 | 6 | 7 | 8 | 9 | 10 | 11 |
| 12 | 13 | 14 | 15 | 16 | 17 | 18 |
| 19 | 20 | 21 | 22 | 23 | 24 | 25 |
| 26 | 27 | 28 | 29 | 30 | 31 |