
티스토리 뷰
#네트워크
#네트워크 실습

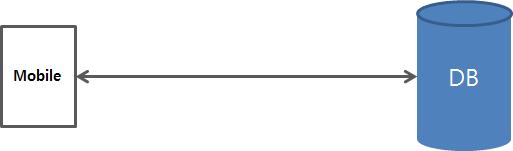
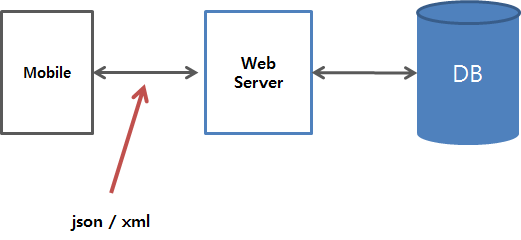
이렇게 생긴 레이아웃을 만들어볼려고 한다. editText 에 인터넷 주소를 적고 HTTP요청 버튼을 누르면 소스가 밑에 textview에 나오도록 할 것이다. 쓰레드가 돌아야하는 부분은 버튼을 눌러서 textview에 데이터가 나올때까지이다. 이걸 그림으로 보면 아래와 같다.

1. 프로젝트를 생성한다.
애플리케이션을 대표하는 id값 = package name

2. Activity_main.xml 을 아래와 같이 쓴다.
1 2 3 4 5 6 7 8 9 10 11 12 13 14 15 16 17 18 19 20 21 22 23 24 25 26 27 28 29 30 31 32 33 34 35 36 37 | <?xml version="1.0" encoding="utf-8"?> <LinearLayout xmlns:android="http://schemas.android.com/apk/res/android" xmlns:tools="http://schemas.android.com/tools" android:orientation="vertical" android:layout_width="match_parent" android:layout_height="match_parent" tools:context="com.ktds.smahn.myrequestweb.MainActivity">
<LinearLayout android:orientation="horizontal" android:layout_width="match_parent" android:layout_height="wrap_content">
<EditText android:id="@+id/etURL" android:layout_weight="9" android:layout_width="wrap_content" android:layout_height="wrap_content" />
<Button android:id="@+id/btnSearch" android:text="HTTP 요청" android:layout_weight="1" android:layout_width="wrap_content" android:layout_height="wrap_content" />
</LinearLayout>
<TextView android:background="#cccccc" android:id="@+id/tvResult" android:layout_width="match_parent" android:layout_height="match_parent" />
</LinearLayout>
|
Layout_width, layout_height에는 3가지가 있다.
Match_parent : 부모의 뷰만큼 꽉 채워라
Wrap_content : 컨텐트 감싸는 만큼 채워라
Fill_parent : 부모의 뷰만큼 꽉 채워라 (안씀)
그리고 실행하면 이렇게 나온다.

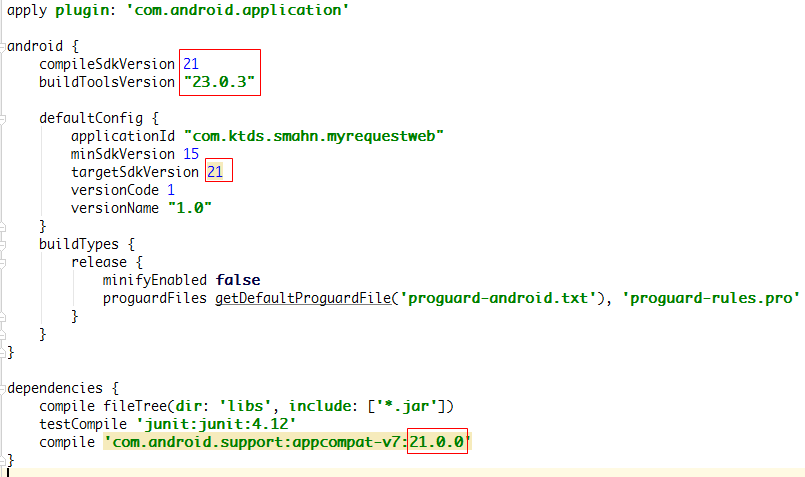
3. 안드로이드 버전을 낮춰주기 위해서 Gradle Scripts → build.gradle 을 아래와 같이 수정해준다.
지금 마시멜로우 버전이기 때문에 권한설정을 다시 다 해줘야하므로… 귀찮아서 롤리팝으로 낮추는 과정이다 ㅋㅋ
이렇게 적고 sync now를 누르면 아래 창에

이렇게 뜰 것이다. 링크를 눌러서 다운로드를 해줘야한다.

다운로드 완료!
4. MainActivity.java를 작성해준다.
1 2 3 4 5 6 7 8 9 10 11 12 13 14 15 16 17 18 19 20 21 22 23 24 25 26 27 28 29 30 31 32 33 34 35 36 37 38 39 40 41 42 43 44 45 46 47 48 49 50 51 52 53 54 55 56 57 58 59 60 61 62 63 64 65 66 67 68 69 70 71 72 73 74 75 76 77 78 79 80 81 82 83 84 85 86 87 88 89 90 91 92 93 94 95 96 97 98 99 100 101 102 103 104 105 106 107 108 109 110 111 112 113 114 115 116 117 118 119 120 121 122 123 124 125 126 127 | package com.ktds.smahn.myrequestweb;
import android.os.Bundle; import android.os.Handler; import android.support.v7.app.ActionBarActivity; import android.view.View; import android.widget.Button; import android.widget.EditText; import android.widget.TextView;
import java.io.BufferedReader; import java.io.IOException; import java.io.InputStreamReader; import java.net.HttpURLConnection; import java.net.MalformedURLException; import java.net.URL;
public class MainActivity extends ActionBarActivity {
private Button btnSearch; private EditText etURL; private TextView tvResult;
private Handler handler;
@Override protected void onCreate(Bundle savedInstanceState) { super.onCreate(savedInstanceState); setContentView(R.layout.activity_main);
btnSearch = (Button) findViewById(R.id.btnSearch); etURL = (EditText) findViewById(R.id.etURL); tvResult = (TextView) findViewById(R.id.tvResult);
handler = new Handler();
btnSearch.setOnClickListener(new View.OnClickListener() { @Override public void onClick(View view) { //HTTP로 요청을 보낸다.. Thread 작업이 필요함.. new Thread(new Runnable() { @Override public void run() {
//작업시작 //1. url을 꺼내온다. String url = etURL.getText().toString();
try { // 요청을 보낼 URL 정보 URL httpURL = new URL(url);
//2. 요청을 보내기 위한 준비를 한다. (요청을 보내기 전) HttpURLConnection conn = (HttpURLConnection) httpURL.openConnection();
conn.setDoInput(true); conn.setDoOutput(true);
// 최대 요청 지연 시간, 요청이 5초 이상 걸릴 경우 요청을 끊는다. conn.setConnectTimeout(5000);
// 3. GET 요청을 한다. // POST 요청을 원할 경우 "POST" 라고 작성한다. conn.setRequestMethod("GET");
// 4. 요청을 보내고, 동시에 응답을 받는다. int responseCode = conn.getResponseCode();
//5. 요청과 응답이 제대로 이루어졌는지 검사한다. // HttpURLConnection.HTTP_OK : 응답이 200 OK 라는 의미 if( responseCode == HttpURLConnection.HTTP_OK ) {
//응답 본문 전체를 담는다. final StringBuffer responseBody = new StringBuffer(); //응답 본문의 한 줄 한 줄씩 얻어온다. String line = null;
//응답 본문이 담겨져 있는 InputStream을 얻어온다. // BufferedReader는 InputStream을 한 줄씩 얻어올 수 있는 객체다. BufferedReader reader = new BufferedReader( new InputStreamReader(conn.getInputStream()) );
while ( (line= reader.readLine()) != null) { //응답 본문이 종료될때까지 반복한다. //응답 본문 한줄씩 결과 객체에 담는다. //줄바꿈을 위해서 매 라인 끝마다 "\n" 을 더해준다. responseBody.append(line + "\n");
} //연결을 순차적으로 끊는다. reader.close(); conn.disconnect();
//독립된 Thread에서 Android Application의 Main Thread로 접근할 수 있는 Handler로, UI View 를 컨트롤한다. handler.post(new Runnable() { @Override public void run() { //6. 결과를 사용자에게 보여준다. tvResult.setText(responseBody.toString()); } });
}
} catch (MalformedURLException e) { return; //throw new RuntimeException(e.getMessage(), e); } catch (IOException e) { return; }
} }).start(); } });
} }
|
5. 실행!

'프로그래밍 > 안드로이드' 카테고리의 다른 글
| [facebook 연동] 메시지, 스토리, 링크 구분하여 뉴스피드 보여주기 (0) | 2016.06.16 |
|---|---|
| ListView 로 리스트 만들기 (1) | 2016.06.13 |
| 레이아웃이란? (0) | 2016.06.13 |
| 마시멜로우 버전 이상에서 권한 얻어오기 (3) | 2016.06.13 |
| 알림창 띄우기(Multi Choice, Single Choice) (0) | 2016.06.10 |
- Total
- Today
- Yesterday
- mybatis
- 배열
- facebook 연동
- mongo db
- aop
- Linear Layout
- 클래스
- ERD
- Erwin
- 제이쿼리
- activity
- Relative Layout
- 글쓰기 버튼
- 자바프로그래밍
- JSP
- spring
- query
- 메뉴바에 버튼 생성하기
- MVC
- 예외처리
- 뒤로가기 버튼
- 쿼리
- jQuery
- 메소드
- er다이어그램
- 포스팅하기
- intent
- sql
- 게시판 만들기
- 뉴스피드 가져오기
| 일 | 월 | 화 | 수 | 목 | 금 | 토 |
|---|---|---|---|---|---|---|
| 1 | 2 | 3 | 4 | |||
| 5 | 6 | 7 | 8 | 9 | 10 | 11 |
| 12 | 13 | 14 | 15 | 16 | 17 | 18 |
| 19 | 20 | 21 | 22 | 23 | 24 | 25 |
| 26 | 27 | 28 | 29 | 30 | 31 |